Ambient Led Backseat Lighting Kit for Model S Review
The Model S has interior lights in most of the correct places – puddle lights beneath the doors, human foot well lighting, trunk and frunk lighting – but the problem lies in its disability to provide useable low-cal. This is particularly the example in the body surface area where its near impossible to see your belonging in the dark of nighttime. I wouldn't classify myself as beingness the most handy person, but when I came beyond a thread discussing an aftermarketUltra-Bright LED interior lighting kit, I decided to flex my do-it-yourself muscles and give it a go.
Looking forUltra-Bright LEDs on the Model X? See our review here.
My DIY skills mainly centers around anything that has a keyboard and monitor. Annihilation outside of that is a crap shoot. My wife measures my success past counting how many parts I impairment when tackling a project, which may include body parts. There'south the "one finger job" (one damaged finger) all the way up to projects involving leg injuries. I'yard just not that handy, though I must say that my Blackvue dashcam project came out pretty nicely.
This LED interior lighting kit was simple enough to arrive the perfect DIY Tesla Model S project for me.
Ultra-Bright LED Interior Calorie-free Kit
Abstract Bounding main, best known for their "Fobpocket" central fob holders, too sells ultra-bright LED interior lights for the Model Southward and X. The light assemblies are drop in replacements for the Tesla OEM lights and sold in sets of 1, four, 8 and 13. At $12.99 a seedling ($eleven.50 on Amazon Prime) it'south certainly non the cheapest just then once more I don't really take a frame of reference for what Ultra-Bright LED assembliesshouldcost.
Before you social club the lights, check how many you will need. This depends on the age of your Model S and whether you take the premium interior lighting package or non. The scarlet dots in the picture below (courtesy of Abstruse Body of water) show the possible locations for interior lighting:

In some cases, fifty-fifty if you don't accept the premium interior lighting package and are missing some lights, you may be able to add additional lighting by post-obit the fantabulous installation instructions outlined on Abstruse Bounding main's site. On my Model S, I have the factory premium interior lighting packet which has thirteen light assemblies.
Each light is a direct replacement for the factory calorie-free in your Model S, not to mention they're 16x brighter. Abstract Bounding main has this to say near the effulgence:
Bear in mind that perception of light is not on a linear calibration, and then although technically 16x brighter, the perceived reality volition be less than that, as well-nigh of the interior surfaces tend to absorb calorie-free. The reality though, is that these make a dramatic divergence to the lighting in your Model S
In addition to the lights, there'south one more particular yous'll want to have handy and that is the spudger tool which volition aid you lot in popping out the factory light assemblies.

Installation
Trunk Ultra-Bright LED Lighting
The Abstruse Ocean installation instructions interruption downwards the installation into 5 parts in increasing levels of difficulty. I was short one seedling and so I only did 4 parts but none of them were beyond my mediocre skill level. The showtime part of the instruction guides you lot though the installation of the trunk light. This is an excellent place to start as the lights in this location are the most attainable, and serves equally a skilful identify for practice. This is also where you'll become familiar with prying the fixture out using the tip of the spudger tool.
The trunk lights are easier to remove since they're pushed into the soft carpeted trunk linings versus beingness deeply recessed into difficult plastic. I constitute that climbing into the trunk made for better access to the lights.
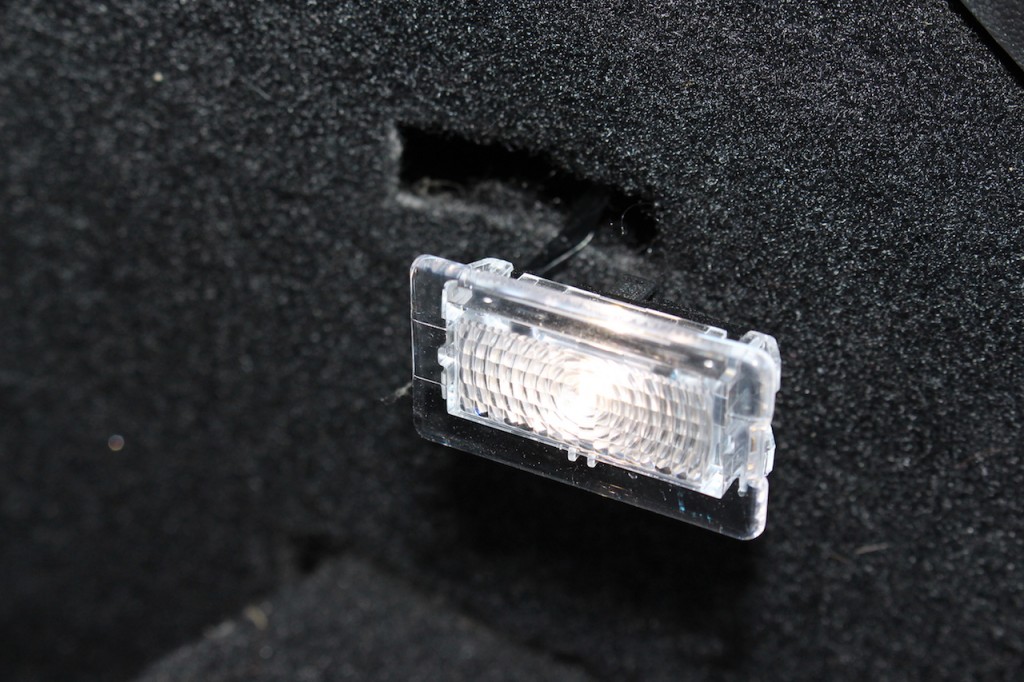

To remove a light, you pry from ane side (try the other if ane side seems likewise difficult) and then gently popular the lite assembly out. Each light has a cable that clicks and latches into place on the light. Depress the latch and pull the cable off. Replace the factory lite with the new LED associates.
Once installed you will detect a drastic difference in illumination.

Installing the Frunk low-cal
The front torso (frunk) has just ane interior low-cal right at the forepart of the frunk making it slightly more difficult to admission merely because of the angle in which your body is positioned when facing the car. Simply once you get the spudger tool in place, popping the light out is fairly elementary.
Equally an aside I've noticed that the inside of my frunk gets pretty dusty/dirty over time even though I rarely open it. I suspect it isn't well sealed from the elements. I've never noticed information technology to be wet inside, but there is an accumulation of dust and dirt that I wouldn't await. I keep extension cables/adapters in in that location so its not a major concern but if you go along groceries or something else in at that place you may want to continue an eye on it and perhaps ask Tesla if its sealed correctly.
Anyhow, here's the Ultra-Bright LED light installed in the frunk.

Installing Pool lights
On the bottom of each of the four doors is what Tesla calls a "Puddle lite" which helps illuminate/puddle the area where you pace in and out of your vehicle. These pool lights come with the optional Model S premium interior lighting upgrade.
Popping these lights out is simple, but once again getting to information technology is tricky since they're mounted upside down beneath each door. I found that laying downwardly on the floor while looking upwards was the best way to gain access. Having a blanket, towel or a nice clean garage floor to lay on would aid.

Installing the pes well lights
Difficulty level 4 (nevertheless pretty simple) is upgrading the pes well lights. Once again, this is all near gaining access and perfecting your angle of attack. The front rider footwell light is only above the are where a passenger'southward feet would be. I found this 1 hard just because I'chiliad correct handed and the light is on the left. The solution was to lay down on the floor mat and look up towards the light.

The driver'south side foot well light was easier as it was on my right side, merely the pull a fast one on with this one is maneuvering around the pedals. The light is right above the accelerator pedal and then you lot have to achieve in quite a means. Get creative with your angles and you'll be able to pop the light out with ease.

It turns out these front foot well lights were a warm up for the Dominate part of level 4 — the rear footwell lights. These lights are attached to mountings that clip onto a horizontal bar located under the forepart seats. To access these you want to heighten the rear of the forepart seats all the way up (but not movement them frontward).
Followed by carefully pulling each side of the light bracket towards you until information technology pops off the bar. Undo the cable and divide the light from its plastic mount.


Getting the low-cal out of the plastic mount without doing damage takes a chip of finesse but if I can do it and so so can you. My suggestion is to wedge the tip of the spudger in and then slightly turn it until the edge of the light sticks out enough for you to grab and remove. Just be careful every bit its pretty easy to damage the plastic mount. Abstract Ocean sells spares which apparently can besides be used to add rear footwell lighting to a Model S without the premium interior lighting package. Once you have the calorie-free out, popping the new 1 in is easy. Re-attach the cable and and then printing the clips back onto the bar.
The pool and foot well lights together brand for a huge difference.

Installing the Glove box light
I only had 12 bulbs so I didn't get a chance to take on level five. The instructions go far sound a chip more than difficult than the others as the space is tight and access is limited, but I suspect it wouldn't be too difficult if y'all play around with your angles.
Summary
The Abstract Ocean Ultra-Bright LED Interior Light Kit provides a simple and elegant way to improve the interior lighting in your Model S. The lights are direct replacements for the factory lights, and their excellent installation instructions provide you all the help you lot demand to get the job washed. Even for a non-handy but self made DIY'er like myself. The lights are as well available on Amazon and eligible for costless one-2 solar day shipping if you have Amazon Prime number.
In daylight the lights are noticeably brighter, At dark they make the world of difference. Information technology took me approximately xxx minutes to replace all 12 lights and that included the time it took for me to document this process by taking photos.
In the end it brings me slap-up pleasure to say this was a zero finger job – no body parts were damaged during the making of this project (a small-scale miracle) and, possibly more than importantly, I didn't exercise any damage to my Model S 🙂
I'd definitely recommend the lights. They've been selling similar hot cakes across TMC so there may exist a bit of a wait to get them. Well worth information technology in my stance.

Source: https://www.teslarati.com/review-tesla-model-s-ultra-bright-led-interior-lighting/
0 Response to "Ambient Led Backseat Lighting Kit for Model S Review"
Post a Comment